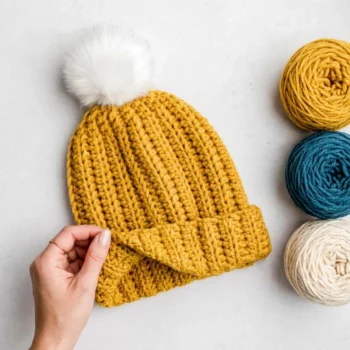
If you’ve been looking for a crochet beanie that actually looks like a knit hat, this is the one. I made this easy crochet beanie with bulky-weight yarn and a simple ribbing stitch, and it came out so stretchy and cozy that people keep asking me if I knitted it. The best part is that it uses only basic stitches, single crochet and half double crochet, so this crochet hat pattern is a great fit for beginners and a satisfying quick make for experienced crocheters too. I’ll walk you through how to make it in sizes from Newborn all the way to Adult Large.

Materials and Tools
Yarn Weight: Bulky weight yarn, Category 5. You’ll need about 200 yards for an Adult Medium size. Some great options include:
- Lion Brand Hue + Me
- Wool of the Andes Superwash Bulky
- Patons Classic Wool Bulky
- Lion Brand Woolspun
Crochet Hook: K-10.5 (6.5mm), or the size you need to meet gauge
You will also need:
- Yarn needle
- Stitch markers (optional but helpful)
- Ruler or flexible tape measure
Gauge and Finished Size
Gauge: 12 stitches and 7.5 rows per 4 inches.
It is important to check your gauge before you start. Since you will be working to a measurement rather than a fixed stitch count, your gauge affects how many rows you will need to crochet to reach the right circumference.
Finished Size: This pattern works for all sizes from Newborn to Adult Large. See the size chart below for details. For this write-up, I am making an Adult Medium with a finished hat length of 12 inches and a circumference of 20 inches.
Hat Size Chart
| Age | Head Circumference | Hat Circumference | Hat Length |
|---|---|---|---|
| Newborn | 12″–14″ | 9″–13″ | 5″ |
| Baby | 14″–16″ | 11″–13″ | 5.75″ |
| Toddler | 16″–18″ | 13″–15″ | 6.5″ |
| Child | 18″–20″ | 15″–17″ | 7″ |
| Teen | 20″–22″ | 17″–19″ | 7.5″ |
| Adult Small | 21″–22″ | 18″–19″ | 8.5″ |
| Adult Medium | 22″–23″ | 19″–20″ | 9″ |
| Adult Large | 23″–24″ | 20″–21″ | 9.5″ |
To find your size, measure around the widest part of your head. Then subtract about 3 inches to get the finished hat circumference. This negative ease is what makes the hat fit snugly and stay on well.
To make a hat with a folded brim, add 2.5 inches to the hat length measurement and chain that total length.
Pattern Notes
- This pattern is written in US crochet terminology.
- The hat is worked flat, back and forth in rows, not in the round.
- Once you finish crocheting, you seam the two long sides together to form a tube.
- Then you gather the top edge closed to shape the crown.
- Almost all stitches are worked in the Back Loop Only (BLO). This is what creates the stretchy ribbing texture.
- The chain 1 at the start of each row does not count as a stitch.
Abbreviations
- st / sts – stitch / stitches
- ch – chain
- sc – single crochet
- hdc – half double crochet
- BLO – back loops only
Special Stitches
There are no special stitches in this pattern. The ribbed texture comes from working the hdc and sc stitches through the back loop only throughout. That simple technique is all it takes to get that beautiful knit-look ribbing.
Pattern Instructions
Getting Started
Before I start crocheting, I take my measurements. For my Adult Medium, I want a finished hat length of 12 inches (with 2.5 inches extra for the folded brim) and a circumference of 20 inches.
Row 1: Chain 36. Starting in the second chain from the hook, make 30 hdc. Then make 5 sc. Turn. (35 sts)
Row 2: Chain 1. Starting in the same first stitch, make 5 sc BLO, then 30 hdc BLO. Turn. (35 sts)
Row 3: Chain 1. Starting in the same first stitch, make 30 hdc BLO, 4 sc BLO, and 1 sc. Turn. (35 sts)
Repeat Rows 2 and 3 until the piece measures 20 inches along the long edge, or whatever circumference measurement you calculated for your size. For my Adult Medium, this came to 36 rows total.
A quick tip: measure along the long edge where the hdc stitches are, not the edge with the single crochets. A flexible fabric tape measure works much better here than a stiff ruler.
Seaming the Hat
Now it is time to put it all together. Fold the crocheted rectangle in half so the two short ends line up, with the right sides facing outward.
Option 1: Slip-Stitch Seam
Place the working row in front and the starting chain edge behind it. Work a row of slip stitches through the back loop of the working row and the corresponding loop of the starting chain at the same time. This gives you a neat, flat seam along the side of the hat.
Option 2: Mattress Stitch Seam
Thread your yarn needle with a yarn tail about three times the length of the seam. Insert the needle under the first stitch on one edge, then under the first stitch on the other edge. Continue sewing back and forth, matching up stitches as evenly as you can. Every few stitches, pull the yarn gently to close the seam. Keep even tension and avoid pulling too tight. Once you reach the end, weave in the ends.
Both methods work well. I tend to reach for the slip-stitch seam when I want to finish quickly, and the mattress stitch when I want the seam to be as invisible as possible.
Gathering the Crown
Pull the yarn through the last loop and trim a long yarn tail, about 12 to 15 inches. Thread this tail onto a yarn needle and run long running stitches all the way around the top open edge of the hat.
Pull the yarn tail to draw the top edge together, pulling it as tight as you can to close the opening completely. Knot the yarn tail on the inside to secure it, and then weave in all remaining ends.
Tips
Check your gauge. Because this hat is sized by measurement rather than stitch count, even a small difference in gauge can change how your hat fits. Make a quick gauge swatch before you dive in.
Use a flexible tape measure. A fabric tape measure is your best friend for measuring the hat as you work. It drapes along the stitches naturally, which makes it much easier to get an accurate reading than a rigid ruler.
Customize the brim. The hat is designed to be 12 inches tall so you can fold over a thick, cozy brim. If you prefer a no-fold beanie, just chain a shorter length, about 9 to 9.5 inches for an Adult Medium, and skip the extra length.
Add a pom pom. A big yarn pom pom on top looks adorable and is easy to make with a pom pom maker tool. You can also make one using your hand, a toilet paper roll, or a cardboard template. Faux fur pom poms with an elastic loop are another fun option if you want a different texture.
Yarn substitutions. This pattern works with any bulky-weight yarn. Just make sure to check your gauge when switching yarns, since different fibers and brands can vary quite a bit in how they crochet up.
Frequently Asked Questions
Can I make this easy crochet beanie with worsted weight yarn? Yes, you can. Use a smaller hook to match a tighter gauge if needed, and focus on crocheting to the measurements in the size chart rather than following the exact row count. The hat will still come out great as long as your finished piece hits the right dimensions.
How do I size this crochet hat pattern for a child or toddler? Use the size chart above and measure the child’s head if you can. Subtract 3 inches from their head circumference to get the finished hat size, then chain enough stitches to reach the hat length for their size. Crochet as many rows as needed to reach the correct circumference.
Why do most of the stitches need to be worked in the back loop only? Working in the back loop only is what creates the stretchy ribbing texture on this hat. It leaves a little ridge on the surface of the fabric that looks just like knit ribbing, and it gives the hat that snug, stretchy fit that is so comfortable to wear.
What is negative ease and why does it matter for this crochet beanie? Negative ease means the finished hat is smaller than your actual head measurement. Since the ribbing stitch is stretchy, the hat will stretch to fit your head perfectly when you put it on. For this pattern, using about 3 inches of negative ease gives a nice snug fit.
Can I sell hats made from this easy crochet beanie pattern? Yes, you are welcome to sell finished items made from this pattern. Many crocheters make and sell these hats at craft fairs, on Etsy, and through local shops. Just use the pattern as a guide and make the items yourself.
I share daily crochet inspiration on Pinterest. Save this article to your Pinterest boards so you can come back to it whenever you are ready to start.