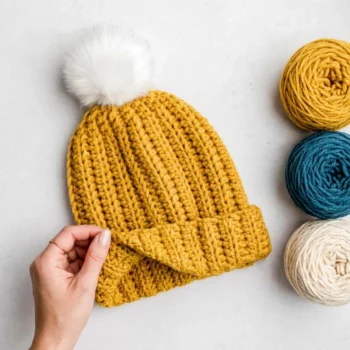
I love making hats that work for everyone, and this crochet flat unisex hat is one of my favorites to share. It is worked flat in rows using just two simple stitches, then sewn together for a clean, polished finish. The ribbing texture gives it a classic look, and the flat top keeps things neat without any bulk. Whether you are making it for yourself, a partner, or a gift, this crochet flat hat pattern comes together quickly and fits most adult heads beautifully.
Materials and Tools
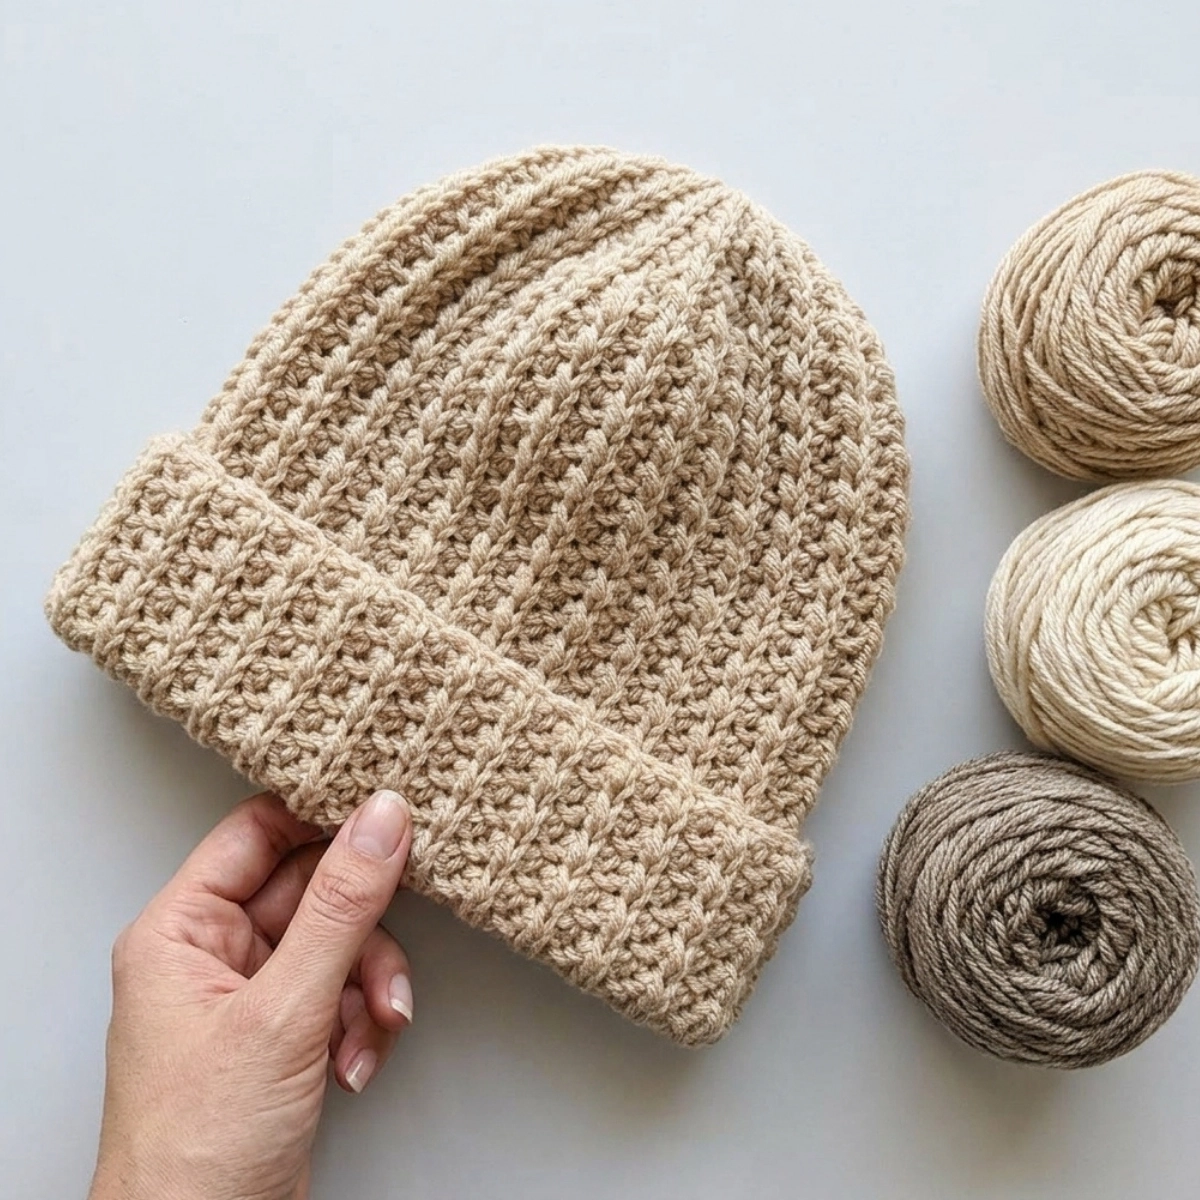
Here is everything you need to make this crochet flat unisex hat:
- Crochet hook: 4.5 mm
- Yarn: Loops & Threads Impeccable, weight 4 (medium/worsted), 100% acrylic, 127.5 g per skein (260 m / 285 yds)
- Yarn quantity: 95 to 100 grams
- Tapestry needle for seaming and weaving in ends
- Scissors
The Loops & Threads Impeccable is a great budget-friendly choice that gives beautiful stitch definition on this hat. Any worsted weight yarn will work as a substitute.
Gauge and Finished Size
- Gauge: 17 stitches = 10 cm (4 inches)
- Head circumference: fits 53 to 57 cm (approximately 21 to 22.5 inches)
Getting gauge is important for this pattern since the finished width of the hat panel directly determines how the hat fits. If your stitches are too loose or too tight, the hat may end up too big or too small.
Pattern Notes
This crochet flat unisex hat is worked sideways in rows. You start with a foundation chain and work the body of the hat from one side to the other. Once the panel reaches the right width, you fold it and seam the two short ends together to form the back of the hat. The top is then gathered and closed with a tapestry needle.
The combination of slip stitches and half double crochets worked through the back loop only creates the ribbed texture that runs horizontally around the hat. The unworked stitches at one end of certain rows shape the folded brim naturally as you go.
This pattern is great for beginners who are comfortable with basic stitches. The stitch repeat is simple once you get into it, and the short rows at the brim edge become easy to follow after the first few rows.
Abbreviations
- ch: chain
- sl st: slip stitch
- sl st blo: slip stitch in back loop only
- HDC: half double crochet
- HDC blo: half double crochet in back loop only
- st(s): stitch(es)
- blo: back loop only
All stitches are in US crochet terminology.
Pattern Instructions
Foundation Chain
Ch 50, plus 1 extra chain for turning. Measure your chain before starting. For a hat with a folded brim, the chain should measure approximately 32 to 34 cm (about 12.5 to 13.5 inches). If 50 chains are not enough to reach that length, add more chains. Make sure the total number of chains, not counting the turning chain, is an even number.
Row 1
Starting into the 2nd ch from hook: work sl st in next ch, HDC in next ch, and repeat from the beginning of that repeat until you have 10 stitches left unworked at the end. The length of those last 10 unworked chains should measure 7 to 8 cm. Sl st in the next 5 stitches (this is half the number of unworked stitches). Turn.
Note: You can adjust the number of unworked stitches at the end of Row 1. Just make sure the number is divisible by 2. In this pattern it is 10.
Row 2
Ch 1, sl st blo in next 5 sts, then work HDC blo in next st, sl st blo in next st, and repeat that combination all the way across. Turn.
Row 3
Ch 1, work sl st blo in next st, HDC blo in next st, and repeat across until you have 10 stitches left unworked. Sl st blo in next 5 sts. Sl st in the next 5 ch. Turn.
Row 4
Ch 1, sl st blo in next 10 sts, then work HDC blo in next st, sl st blo in next st, and repeat that combination all the way across. Turn.
Row 5
Ch 1, work sl st blo in next st, HDC blo in next st, and repeat across until you have 10 stitches left. Sl st blo in next 5 sts. Turn.
Row 6
Ch 1, sl st blo in next 5 sts, then work HDC blo in next st, sl st blo in next st, and repeat all the way across. Turn.
Row 7
Ch 1, work sl st blo in next st, HDC blo in next st, and repeat across until you have 10 stitches unworked. Sl st blo in next 10 sts. Turn.
Row 8
Ch 1, sl st blo in next 10 sts, then work HDC blo in next st, sl st blo in next st, and repeat all the way across. Turn.
Repeat Rows 5 through 8 until the width of your hat panel reaches 47 to 48 cm (approximately 18.5 to 19 inches).
Sewing the Hat Together
Once your panel is the right width, it is time to seam and close the hat.
Fold the hat with the wrong side facing out. Position it so the foundation chain is closest to you. Insert your hook into the first loop of the foundation chain and then through the back loop of the stitch on the other side. Pull the yarn through to create a slip stitch. Continue like this, working into each foundation chain loop and its matching back loop, all the way to the end. This creates a nearly invisible seam.
Cut the yarn and leave a tail of about 15 cm (6 inches). Pull that tail through the last loop to secure it.
Thread the tail onto a tapestry needle. Weave the needle back and forth through the stitches around the top opening of the hat. Pull the tail firmly to gather the top closed. Stitch back and forth a few times to secure it, then weave in all ends.
Tips
Working the first slip stitch at the transition points can look a little messy at first. To get a neater finish, try inserting your hook into the horizontal bar (the ch-1 from the previous row) at the same time as the next stitch before completing the slip stitch. This keeps the transition between the brim section and the body of the hat looking smooth and clean.
If your gauge is a little loose or tight, adjust your hook size by half a millimeter to get a better fit before you start the full hat.
Blocking the finished hat lightly after seaming helps the ribbing lay flat and gives it a polished, store-bought look.
To customize the fit, you can add or remove chains from your starting chain as long as you keep the number even. For a larger head circumference, simply continue working Rows 5 through 8 a few more repeats before seaming.
This pattern works beautifully in solid colors, but it also looks great in heathered or tonal yarns that let the ribbing texture show off.
Frequently Asked Questions
Can I make this crochet flat unisex hat in a different yarn weight?
Yes, you can substitute a different yarn weight, but you will need to adjust your hook size and check your gauge. Using a bulky yarn will create a larger, thicker hat, while a DK or sport weight will make a smaller, lighter one. Always swatch and measure before starting.
How do I make the hat smaller or larger?
To change the height of the hat (from brim to crown), add or subtract chains from your starting chain, keeping the total an even number. To change the circumference, work more or fewer repeats of Rows 5 through 8 before seaming. Stop when your panel measures the desired width.
What does “back loop only” mean in this pattern?
Working in the back loop only means you insert your hook into the loop that is farthest away from you. Skipping the front loop is what creates the horizontal ridged ribbing texture in this hat.
The seam on my hat is visible. How do I make it invisible?
Make sure you are folding the hat with the wrong side out before seaming. Work the seam slip stitches firmly but not too tightly. Catching just the foundation chain loop on one side and the back loop on the other helps the seam sit flat. Blocking the finished hat can also help it blend in.
How long does this crochet flat unisex hat take to make?
Most crocheters with basic experience can complete this hat in two to four hours. The simple stitch repeat makes it easy to get into a rhythm, so it works up faster than it looks.
I share daily crochet inspiration on Pinterest. Save this article to your Pinterest boards so you can come back to it whenever you are ready to start.