The Weekend Snuggle Sweater is my ultimate lounge sweater. It is cosy, slouchy, and oh so comfortable. I designed this easy crochet sweater to be long enough to wear over leggings, perfect for lazy weekends on the couch or dressed up with jeans and ankle boots for a casual outing. I was having a strangely cold summer when I first made this, and I just really wanted something I could snuggle into. This crochet pullover sweater turned out to be exactly that.
Materials and Tools
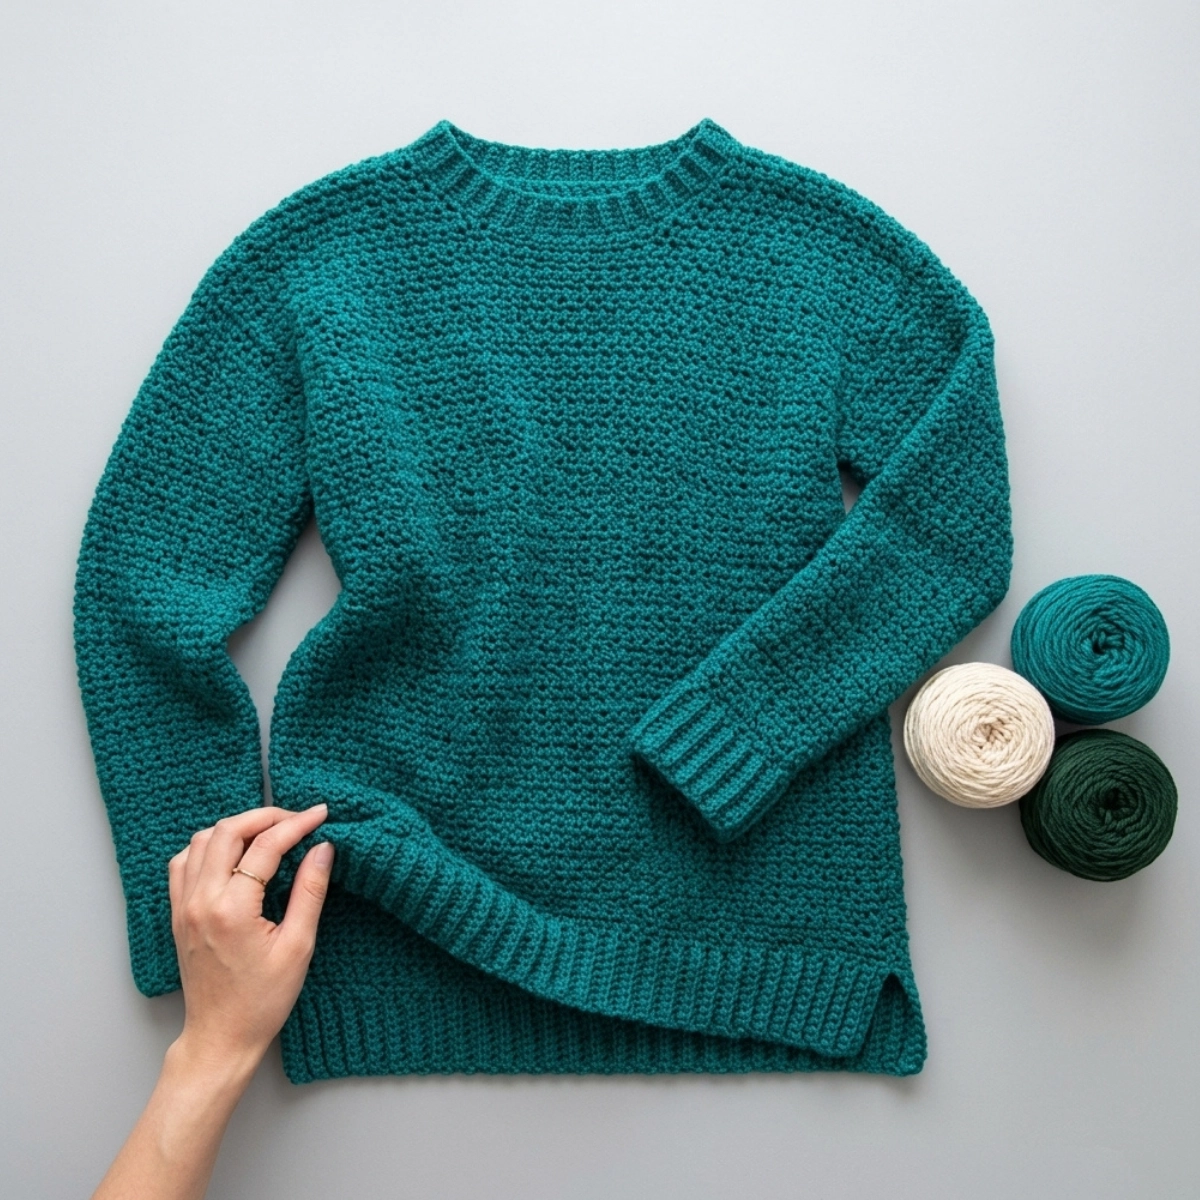
- Yarn: WeCrochet Gloss DK, DK/Light weight (3), 70% Merino Wool + 30% Silk, 113m/123 yards per 50g skein
- Amount: 9(9, 10, 11, 11, 12, 13) skeins, approx. 415(435, 455, 510, 550, 585, 640)g
- Colour used: Kenai (a gorgeous vibrant green-teal)
- Hook: 6mm (US J) crochet hook
- Darning needle
- Scissors
- Stitch markers
Yarn substitution notes: WeCrochet Gloss DK runs quite thick for a DK weight yarn. It sits very close to a worsted weight. If you are substituting, pick a thicker DK yarn to match gauge easily. For a machine-washable version, Swish DK (superwash merino) works great. For a summer sweater, CotLin (cotton and linen blend) is a lovely lighter option.
Gauge and Finished Size
Gauge: 15 stitches wide x 16 rows tall = 10cm/4″ square in single crochet column stitch.
Always swatch before starting a garment. Meeting gauge is important here because the measurements rely on it.
Finished measurements (lying flat):
Sizing follows XS(S, M, L, XL, 2XL, 3XL).
In centimetres:
- Bust: 92(96, 102, 112, 122, 132, 142)
- Length: 56(56, 56, 58, 58, 58, 61)
- Armhole: 16(16, 18, 18, 19, 19, 20)
- Sleeve length: 41cm for all sizes
In inches:
- Bust: 36(38, 40, 44, 48, 52, 56)
- Length: 22(22, 22, 23, 23, 23, 24)
- Armhole: 6.5(6.5, 7, 7, 7.5, 7.5, 8)
- Sleeve length: 16″ for all sizes
Note: Body length will stretch out approximately 5-8cm/2-3″ once the sweater has been worn.
Sample shown is a size small on a 5’3″ model with a 32″ bust.
Pattern Notes
This sweater is crocheted in 4 separate panels: a front, a back, and 2 sleeves. Both the body and the sleeves are worked from the bottom up. I start with the ribbing, then extend the body and sleeves to the desired length. There are alteration notes included so you can make the sweater shorter or longer to suit you.
Once all 4 pieces are done, I crochet the neckline ribbing separately and then sew everything together using a whip stitch. When sewing crochet pieces together, the key to a clean finish is getting the right tension on your seams. Too tight and the seams will pucker. Too loose and you will have gaps between your stitches.
I always recommend sewing on a flat surface so your stitches stay even. And if you have not tried a bent tip tapestry needle yet, it is a total game changer. The bent tip makes it so much easier to pick up strands of yarn and I can sew pieces together in half the time compared to a straight needle.
The sizing guide reads like this: XS(S, M, L, XL, 2XL, 3XL). For example, “Ch 71(79, 87, 95, 103, 111, 119)” means Ch 71 for XS, Ch 79 for Small, and so on. If there is only one number listed, it applies to all sizes.
This pattern uses US crochet terms.
The turning chain ch 1 does NOT count as a stitch, unless otherwise noted. Total stitch counts are shown between < >.
Abbreviations
- Ch = Chain
- Sl st = Slip Stitch
- SC = Single Crochet
- SC2tog = Single Crochet 2 stitches together
- BLO = Back Loop Only
- St(s) = Stitch(es)
- Rep = Repeat
- Sk = Skip
- 2SC = Place 2 SC into the same stitch
Special Stitches
Single Crochet Columns (SC Columns)
This is the only stitch pattern used throughout the sweater body and sleeves. It is made up of just single crochets and chains, so it is very beginner friendly. No complicated charts needed.
I love this stitch because it creates the appearance of a dense fabric, but the chains make it airy and open up close. It has incredible drape, which is the key to that lovely slouchy look.
Chain an even number of stitches.
Row 1: SC in 2nd ch from hook, *ch 1, sk 1, SC; rep from * until end, turn.
Row 2: Ch 1, SC in 1st st, *ch 1, sk 1, SC; rep from * until end, turn.
Repeat Row 2 until desired length.
Pattern Instructions
Back Panel
The body panels are crocheted from the bottom up. The ribbing is worked vertically, and then we crochet along the long edge of the ribbing to build the back panel.
Back Ribbing
Foundation Chain: Ch 9.
Row 1: SC into 2nd ch from hook, SC in each st until end, turn. <8>
Row 2: Ch 1, BLO SC 7, SC in last st, turn. <8>
Repeat Row 2 until Row 69(73, 77, 85, 93, 101, 109).
Do not fasten off. We will now work along the long edge of the band. Each row of ribbing equals 1 stitch.
Back Body
Row 1: Ch 1, SC in 1st row, *ch 1, sk 1 row, SC in next row; rep from * until end, turn. <69(73, 77, 85, 93, 101, 109)>
Row 2: Ch 1, SC in 1st st, *ch 1, sk 1 st, SC; rep from * until end, turn. <69(73, 77, 85, 93, 101, 109)>
Repeat Row 2 until Row 80(80, 80, 84, 84, 84, 88).
Alteration note: You can add or remove rows to make your sweater longer or shorter.
Fasten off.
Front Panel
Repeat all Back Panel instructions until Row 70(70, 70, 74, 74, 74, 78).
Alteration note: If you altered the back panel length, crochet until you are 10 rows short of your total back panel rows. For example, if you crocheted 54 rows for the back, crochet 44 rows for the front.
Do not fasten off. We will now crochet the shoulder shaping.
Shoulder Shaping (Left Side)
Counting from your crochet hook, place a stitch marker in the 28th(30th, 32nd, 36th, 40th, 44th, 48th) stitch. The stitch marker should be in a chain space, not a SC.
Row 1: Ch 1, SC in 1st st, *ch 1, sk 1 st, SC; rep from * until 2 sts from the st marker, SC2tog, turn. <26(28, 30, 34, 38, 42, 46)>
Row 2: Ch 1, SC2tog, *ch 1, sk 1 st, SC; rep from * until end, turn. <25(27, 29, 33, 37, 41, 45)>
Row 3: Ch 1, SC in 1st st, *ch 1, sk 1 st, SC; rep from * until 2 sts left, SC2tog, turn. <24(26, 28, 32, 36, 40, 44)>
Row 4: Rep Row 2. <23(25, 27, 31, 35, 39, 43)>
Row 5: Rep Row 3. <22(24, 26, 30, 34, 38, 42)>
Row 6: Rep Row 2. <21(23, 25, 29, 33, 37, 41)>
Row 7: Rep Row 3. <20(22, 24, 28, 32, 36, 40)>
Row 8: Rep Row 2. <19(21, 23, 27, 31, 35, 39)>
Row 9: Ch 1, SC, *ch 1, sk 1 st, SC; rep from * until end, (last SC should be on top of the SC2tog), turn. <19(21, 23, 27, 31, 35, 39)>
Row 10: Ch 1, SC, *ch 1, sk 1 st, SC; rep from * until end. Fasten off. <19(21, 23, 27, 31, 35, 39)>
Shoulder Shaping (Right Side)
Counting from the stitch marker, skip 14 sts, insert hook into next st (hook should be in a SC) and pull up a loop.
Row 1: Ch 1, SC2tog, SC, *ch 1, sk 1 st, SC; rep from * until end, turn. <26(28, 30, 34, 38, 42, 46)>
You can place a stitch marker in the SC2tog to make it easier to find. In Row 2, the SC2tog is the last stitch of the row.
Row 2: Ch 1, *SC, ch 1, sk 1 st; rep from * until 2 sts left, SC2tog, turn. <25(27, 29, 33, 37, 41, 45)>
Row 3: Ch 1, SC2tog, SC, *ch 1, sk 1 st, SC; rep from * until end, turn. <24(26, 28, 32, 36, 40, 44)>
Row 4: Rep Row 2. <23(25, 27, 31, 35, 39, 43)>
Row 5: Rep Row 3. <22(24, 26, 30, 34, 38, 42)>
Row 6: Rep Row 2. <21(23, 25, 29, 33, 37, 41)>
Row 7: Rep Row 3. <20(22, 24, 28, 32, 36, 40)>
Row 8: Rep Row 2. <19(21, 23, 27, 31, 35, 39)>
Row 9: Ch 1, SC (first SC should be on top of the SC2tog), *ch 1, sk 1 st, SC; rep from * until end, turn. <19(21, 23, 27, 31, 35, 39)>
Row 10: Ch 1, SC, *ch 1, sk 1 st, SC; rep from * until end. Fasten off. <19(21, 23, 27, 31, 35, 39)>
Sleeves (Make 2)
The sleeves are worked from the cuff up. Just like the body panels, I crochet the ribbing vertically first and then work the sleeve directly onto the edge of the ribbing.
Sleeve Ribbing
Foundation Chain: Ch 11.
Row 1: SC into 2nd ch from hook, SC in each st until end, turn. <10>
Row 2: Ch 1, BLO SC 9, SC in last st, turn. <10>
Repeat Row 2 until Row 31(31, 35, 35, 39, 39, 43).
Do not fasten off.
Sleeve Body
Row 1: Ch 1, SC in 1st row, *ch 1, sk 1 row, SC in next row; rep from * until end, turn. <31(31, 35, 35, 39, 39, 43)>
Rows 2-4: Ch 1, SC in 1st st, *ch 1, sk 1 st, SC; rep from * until end, turn. <31(31, 35, 35, 39, 39, 43)>
Row 5 (increase): Ch 1, 2SC in 1st st, ch 1, sk 1 st, *SC, ch 1, sk 1 st; rep from * until last st, 2SC in last st, turn. <33(33, 37, 37, 41, 41, 45)>
Rows 6-8: Ch 1, SC 2, *ch 1, sk 1 st, SC; rep from * until last st, SC in last st, turn. <33(33, 37, 37, 41, 41, 45)>
Row 9 (increase): Ch 1, SC in 1st st, ch 1, SC in next st, *ch 1, sk 1 st, SC; rep from * until last st, ch 1, SC in last st, turn. <35(35, 39, 39, 43, 43, 47)>
Rows 10-13: Rep Rows 2-4. <35(35, 39, 39, 43, 43, 47)>
Row 14: Rep Row 5. <37(37, 41, 41, 45, 45, 49)>
Rows 15-17: Rep Rows 6-8. <37(37, 41, 41, 45, 45, 49)>
Row 18: Rep Row 9. <39(39, 43, 43, 47, 47, 51)>
Rows 19-22: Rep Rows 2-4. <39(39, 43, 43, 47, 47, 51)>
Row 23: Rep Row 5. <41(41, 45, 45, 49, 49, 53)>
Rows 24-26: Rep Rows 6-8. <41(41, 45, 45, 49, 49, 53)>
Row 27: Rep Row 9. <43(43, 47, 47, 51, 51, 55)>
Rows 28-31: Rep Rows 2-4. <43(43, 47, 47, 51, 51, 55)>
Row 32: Rep Row 5. <45(45, 49, 49, 53, 53, 57)>
Rows 33-35: Rep Rows 6-8. <45(45, 49, 49, 53, 53, 57)>
Row 36: Rep Row 9. <47(47, 51, 51, 55, 55, 59)>
Rows 37-40: Rep Rows 2-4. <47(47, 51, 51, 55, 55, 59)>
Row 41: Rep Row 5. <49(49, 53, 53, 57, 57, 61)>
Rows 42-44: Rep Rows 6-8. <49(49, 53, 53, 57, 57, 61)>
Row 45: Rep Row 9. <51(51, 55, 55, 59, 59, 63)>
Rows 46-49: Rep Rows 2-4. <51(51, 55, 55, 59, 59, 63)>
Row 50: Rep Row 5. <53(53, 57, 57, 61, 61, 65)>
Rows 51-53: Rep Rows 6-8. <53(53, 57, 57, 61, 61, 65)>
Row 54: Rep Row 9. <55(55, 59, 59, 63, 63, 67)>
Fasten off.
Fold sleeve in half lengthways and whip stitch the sides together.
Neckline Ribbing
Foundation Chain: Ch 6.
Row 1: SC into 2nd ch from hook, SC in each st until end, turn. <5>
Row 2: Ch 1, BLO SC 4, SC in last st, turn. <5>
Repeat Row 2 until ribbing measures 46cm/18″ (approximately Row 66).
The neckline ribbing is very stretchy, so this measurement works for all sizes.
Assembly
Lay the front panel on top of the back panel. Whip stitch the shoulder seams together.
Whip stitch up the sides of the body panels, leaving a 16(16, 18, 18, 19, 19, 20)cm / 6.5(6.5, 7, 7, 7.5, 7.5, 8)” gap for the sleeves.
Split hem option: If you want a split at the side seam as shown in the photos, sew from the top of the ribbing down. If you prefer a regular hem with no split, sew from the very bottom of the ribbing.
Whip stitch the top of the sleeves to the body. Whip stitch the neckline ribbing evenly around the open neckline edge. Sew the edges of the neckline ribbing together.
Weave in all your ends. Steam and block your sweater.
That’s it. Your Weekend Snuggle Sweater is done!
Tips
Always swatch. The single crochet column stitch has a lot of drape, and different yarns will behave differently. Swatching saves you from making a sweater that is too big or too small.
Blocking makes a big difference. After finishing, steam and block your sweater. This evens out the stitches, opens up the stitch pattern beautifully, and helps the sweater hang properly.
For silk yarn blends: Silk yarns can transfer colour onto your hands while you crochet. It washes right off and once the sweater is blocked there should be no colour transfer at all.
Use a bent tip tapestry needle for seaming. The bend at the tip makes it so much easier to pick up yarn strands and sew even stitches. It genuinely cuts your seaming time in half.
To lengthen or shorten the body: Simply add or remove rows from the back panel before fastening off. For the front panel, always stop 10 rows before the total row count of your back panel.
For a longer sleeve: Continue the increase pattern beyond Row 54. The increases are evenly spaced throughout the sleeve, so you can keep extending the pattern as needed.
Want no split hem? Simply sew all the way down from the bottom of the ribbing when joining the side seams instead of starting from the top.
Frequently Asked Questions
Can I use a different yarn for this Weekend Snuggle Sweater pattern?
Yes, you can substitute any DK weight yarn. The WeCrochet Gloss DK used in this pattern runs thick for a DK, so pick a heavier DK yarn when substituting to help meet gauge. For a machine-washable version, a superwash merino DK works really well. For a summer version, a cotton or cotton blend is a great option.
What does “ch 1 does not count as a stitch” mean?
In this pattern, the ch 1 at the beginning of each row is just a turning chain to position your hook. It does not count as a stitch, so you always start your first single crochet into the first actual stitch of the row, not into the chain.
How do I adjust the Weekend Snuggle Sweater for a longer or shorter length?
For the back panel, simply add or remove rows before fastening off. If you added rows to the back, the front panel should be crocheted to 10 rows fewer than your back panel total before starting the shoulder shaping.
Why is my sleeve increasing unevenly?
The sleeve increases happen every 4 to 5 rows and are spread throughout the 54 rows of the sleeve. When the pattern says “Rep Rows 2-4” for a section spanning 4 rows, it means you repeat the same stitch pattern 4 times. Rows 2, 3, and 4 all use the same stitch instruction, so you are essentially just repeating that single row the number of times indicated.
Can I make this sweater into a dress or crop top?
Absolutely. To make a sweater dress, just keep adding rows to the body panels until you reach your desired length. For a crop version, reduce the back panel rows. The alteration notes in the pattern make it easy to customise the length for any look you want.
I share daily crochet inspiration on Pinterest. Save this article to your Pinterest boards so you can come back to it whenever you are ready to start.