I’m kicking off with my first sweater design of the new year, and I went for something beginner-friendly, cozy, and just plain fun to make. This is my one-piece crochet sweater, and I’m calling it the Susan Sweater, inspired by my sister-in-law. It has this great casual style from the horizontal texture of the stitches, and it is honestly one of the most comfortable things I’ve ever crocheted. If you’ve been wanting to try making a crochet sweater but felt a little intimidated, the Susan one-piece crochet sweater is the perfect place to start.
Materials and Tools
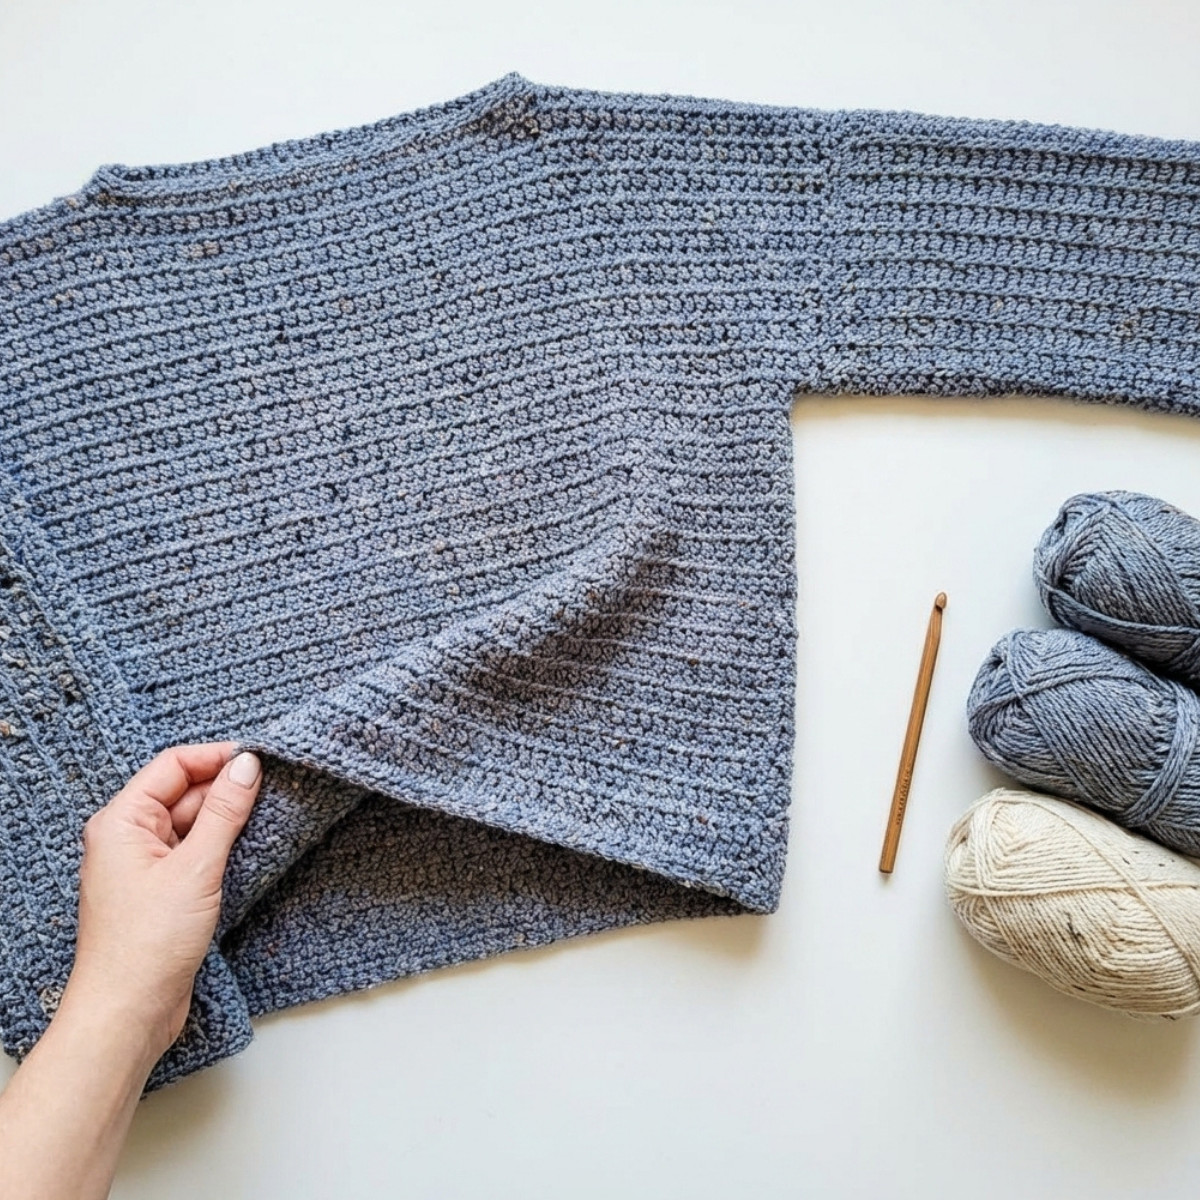
Here is everything you need to make this one-piece crochet sweater:
- Hook: 6mm crochet hook
- Yarn: Any Category 4 (worsted weight) yarn. I used Red Heart Comfort in the color Denim Fleck, which is discontinued but you can still find it in some places. Any Category 4 yarn will work just fine.
- Stitch markers
- Scissors
- Tapestry needle
Approximate yardage by size:
- XS: 800 yards / 731 meters
- S: 950 yards / 868 meters
- M: 1000 yards / 914 meters
- L: 1200 yards / 1097 meters
- XL: 1400 yards / 1280 meters
- 2XL: 1650 yards / 1508 meters
- 3XL: 1750 yards / 1600 meters
- 4XL: 1850 yards / 1691 meters
- 5XL: 1950 yards / 1783 meters
Gauge and Finished Size
Gauge
Body portion (in SCFLO): 11 stitches x 10 rows = 4″ x 4″ (2.75 stitches per inch and 2.5 rows per inch)
Finished Measurements
This sweater is meant to fit slightly snug with up to 4 inches of negative ease. It has a good amount of stretch.
- XS: 31″ circumference
- S: 33.5″ circumference
- M: 37″ circumference
- L: 41″ circumference
- XL: 44″ circumference
- 2XL: 48″ circumference
- 3XL: 52″ circumference
- 4XL: 54″ circumference
- 5XL: 56″ circumference
Sizes available: XS through 5XL
Difficulty level: Beginner
Pattern Notes for the One-Piece Crochet Sweater
Before you dive in, here are a few things to know about this one-piece crochet sweater:
To make this sweater, you should know how to work in the back bump (BB) of a foundation chain, how to slip stitch, how to tie on yarn to add stitches, how to tie off, how to single crochet in the front loop only, and how to seam.
The sweater is made as one complete piece. You work the front body first, then add chains on either side for the sleeves and create the neck hole as part of the back sleeve rows. After that, you work the back body. The only seaming is along the sleeves and sides. There are no shoulder seams at all, which I love.
The SCFLO (single crochet in the front loop only) is a simple technique. You just insert your hook through the front loop of the stitch only instead of through both loops. It creates that beautiful horizontal texture that runs all the way across the sweater and the sleeves.
Turning chains do NOT count as stitches in this pattern.
The stitch count for each row is given in parentheses at the end of that row.
All instructions are written for sizes XS, S, M, L, XL, 2XL, 3XL, 4XL, 5XL in that order.
Abbreviations
- YO = yarn over
- CH = chain
- BB = back bump
- ST = stitch
- SL ST = slip stitch
- SL ST BLO = slip stitch in the back loop only
- SC = single crochet
- SCFLO = single crochet in the front loop only
One-Piece Crochet Sweater Pattern Instructions
Instructions for all sizes are given in this order: XS, S, M, L, XL, 2XL, 3XL, 4XL, 5XL
Front Body
Chain 42, 46, 50, 56, 62, 68, 72, 76, 80 + 1 to turn.
Front Body Row 1: Starting in the 2nd chain from the hook, SC in the BB of each chain across the row. CH 1 and turn. (42, 46, 50, 56, 62, 68, 72, 76, 80)
Front Body Row 2: Starting in the 1st stitch, SCFLO in each stitch across. CH 1 and turn. (42, 46, 50, 56, 62, 68, 72, 76, 80)
Front Body Rows 3 to 26, 26, 26, 28, 30, 32, 36, 40, 44: Repeat Front Body Row 2, then tie off. We are about to add extra chains on either side for the sleeves and neck hole rows. (42, 46, 50, 56, 62, 68, 72, 76, 80)
Sleeves and Neck Hole Rows
Once you have tied off, chain 36, 36, 38, 40, 40, 42, 42, 44, 44.
Front Side Sleeve Row 1: Now that you have chained the appropriate number for your size, continue SCFLO across the existing stitches, then chain the same number again for the other sleeve. CH 1 and turn. (114, 118, 126, 136, 142, 152, 156, 164, 168)
Front Side Sleeve Row 2: Starting in the 2nd chain from the hook, SC in the BB of the sleeve chains, SCFLO in all the body stitches, then SC in the BB of the remaining sleeve chains. CH 1 and turn. (114, 118, 126, 136, 142, 152, 156, 164, 168)
Front Side Sleeve Row 3: Starting in the 1st stitch from the hook, SCFLO across the row. CH 1 and turn. (114, 118, 126, 136, 142, 152, 156, 164, 168)
Front Side Sleeve Rows 4 to 15, 15, 17, 17, 18, 20, 22, 23, 25: Repeat Front Side Sleeve Row 3. CH 1 and turn. (114, 118, 126, 136, 142, 152, 156, 164, 168)
Neck Hole Row (also counts as Back Side Sleeve Row 1): Starting in the 1st stitch from the hook, SCFLO to stitch number 44, 46, 49, 54, 56, 61, 61, 65, 67, then chain loosely for 26, 26, 28, 28, 30, 30, 34, 34, 34 and skip the same number of stitches appropriate for your size. Continue SCFLO for the remainder of the row. CH 1 and turn. (114, 118, 126, 136, 142, 152, 156, 164, 168)
Back Side Sleeve Row 2: Starting in the 1st stitch from the hook, SCFLO to stitch number 44, 46, 49, 54, 56, 61, 61, 65, 67, then SC in the BB of your neck hole chains, then continue SCFLO for the remainder of the row. CH 1 and turn. (114, 118, 126, 136, 142, 152, 156, 164, 168)
Back Side Sleeve Row 3: Starting in the 1st stitch from the hook, SCFLO across the row. CH 1 and turn. (114, 118, 126, 136, 142, 152, 156, 164, 168)
Back Side Sleeve Rows 4 to 15, 15, 17, 17, 18, 20, 22, 23, 25: Repeat Back Side Sleeve Row 3. Tie off. (114, 118, 126, 136, 142, 152, 156, 164, 168)
Back Body
Back Body Row 1: Tie on at stitch 37, 37, 39, 41, 41, 43, 43, 45, 45 (this becomes your new stitch number 1). Starting the count at stitch 1, SCFLO until stitch number 42, 46, 50, 56, 62, 68, 72, 76, 80. CH 1 and turn. (42, 46, 50, 56, 62, 68, 72, 76, 80)
Back Body Row 2: Starting in the 1st stitch from the hook, SCFLO across the row. CH 1 and turn. (42, 46, 50, 56, 62, 68, 72, 76, 80)
Back Body Rows 3 to 25, 25, 25, 27, 29, 31, 35, 39, 43: Repeat Back Body Row 2. CH 1 and turn. (42, 46, 50, 56, 62, 68, 72, 76, 80)
Back Body Row 26, 26, 26, 28, 30, 32, 36, 40, 44: Starting in the 1st stitch from the hook, SC normally through both loops across the row. Tie off. (42, 46, 50, 56, 62, 68, 72, 76, 80)
Assembly and Finishing
Once all the pieces are worked, it is time to put your one-piece crochet sweater together. This is the only assembly step in the whole project, so enjoy it!
Fold your sweater right side in with the wrong side facing out. Line up the sleeves and sides neatly. Take an approximately 4-foot length of yarn and your tapestry needle. Whip stitch (or use any seaming stitch you prefer) from each sleeve cuff, through the armpit, and down to the bottom hem on each side. Turn the sweater right side out.
Neck hole finishing: Find the middle stitch at the back of the neck hole. SC in each stitch around the neck hole. Without joining, continue in a spiral with a SL ST BLO around the entire neck hole, then tie off.
For a cleaner tie off at the neck, when you complete the last stitch, drop the working loop off your hook. Push the hook from back to front through the two loops of the next stitch. Pick up your working loop and pull it through to the inside of the neck hole, then tie off normally.
Sleeve cuffs: Tie on at the seam of each sleeve and repeat the neck hole finish: 1 round of SC followed by 1 round of SL ST BLO in a spiral, then tie off.
Bottom hem: Repeat the same finishing for the bottom of your sweater: 1 round of SC followed by 1 round of SL ST BLO in a spiral, then tie off.
Weave in all your ends and give yourself a pat on the back!
Tips for Making the One-Piece Crochet Sweater
This sweater has lots of room for customization, and that is honestly one of my favorite things about it. Here are a few tips to help you get the best result.
The sleeves in this pattern are designed as 3/4 length. If you want full-length sleeves, simply add more chains on either side when you tie on for the sleeve rows. It is an easy adjustment.
To change the body length, just add extra rows before and after the sleeve rows. The pattern as written sits just below the waist, but you can make it longer or shorter depending on what you like.
If you want a wider neckline for a bit of an off-the-shoulder look, you can do that too with a little simple math to adjust the neck hole chain count.
The SCFLO stitch is very stretchy, so do not panic if your fabric looks very narrow as you are working. It will have plenty of give once you are done. Checking your gauge before you start is the best way to make sure your sizing comes out right.
Use stitch markers to keep track of the neck hole placement and sleeve stitch counts. This one-piece crochet sweater is straightforward, but the markers will keep things stress-free.
Frequently Asked Questions
Is this one-piece crochet sweater really beginner friendly? Yes, it truly is. The entire body is worked in single crochet in the front loop only, which is a simple one-row repeat. The construction is unique but easy to follow once you understand the layout. If you can single crochet and seam, you can make this sweater.
What does one-piece crochet sweater mean? Is it really just one piece? It means the sweater is crocheted as a single flat piece that includes both sleeves and the body all together. There are no separate panels to sew together at the shoulders. The only seaming you do is along the sleeves and sides, which is minimal and quick.
Can I make this one-piece crochet sweater longer? Absolutely. Just add more rows before you start the sleeve section and after you finish it on the back body. Each additional row adds about 0.4 inches to the body length, so it is easy to calculate how many rows you need.
What yarn works best for this one-piece crochet sweater pattern? Any Category 4 worsted weight yarn will work. I used Red Heart Comfort, which is soft and drapey and worked beautifully for this design. Choose something with a bit of softness since this is a garment you will be wearing against your skin.
How do I know which size to make? Compare the finished measurements in the pattern to your own body measurements. This sweater is designed with negative ease, meaning it is meant to be slightly smaller than your actual measurements because it stretches. For a comfortably snug fit, match the sweater circumference to your bust measurement. For a looser fit, size up.
I share daily crochet inspiration on Pinterest. Save this article to your Pinterest boards so you can come back to it whenever you are ready to start.